
What is Caching?
Before we start, please note that you can find the github repository with the completed project
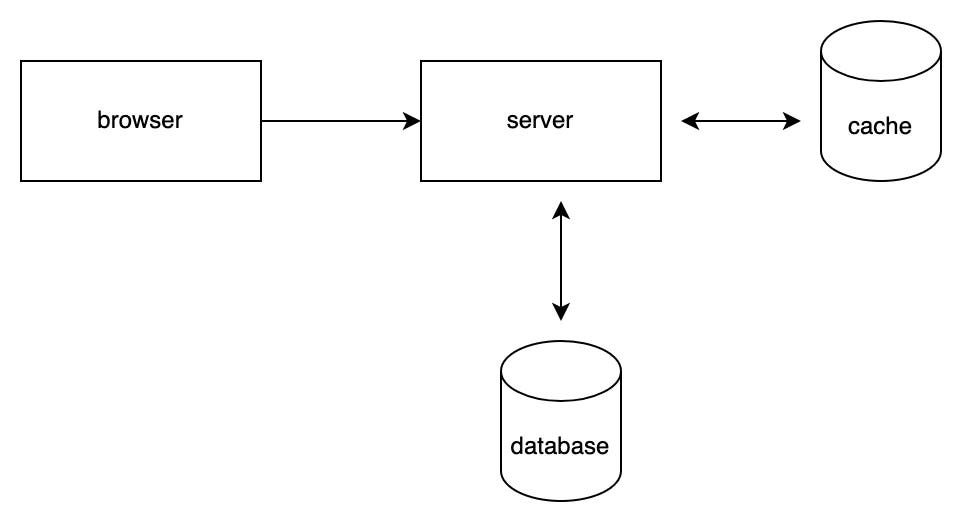
Caching is a fairly old technique designed to improve your application’s performance and reliability.
Caching involves saving frequently requested data in an intermediary store called the “cache store” to avoid unnecessary calls to the primary database.
An HTTP request asking for data cached by the server will receive it directly from the cache store instead of getting it from a database. Which is much faster!
Why do you need caching?
Any web application that has some success will eventually run into bottlenecks. The most common bottleneck is usually related to how information is fetched from a primary database, like Postgres or MySQL.
Indeed, as the number of users grows, so does the number of HTTP requests made to the server. This results in the same data being fetched all over again and again. Optimizing your application for speed and efficiency is important by caching frequently requested data.
Since most relational databases involve structured data, they are optimised for reliability and not for speed. That means the data they store on a disk is many times slower than the RAM. Using a NoSQL database does not bring any tremendous performance gains either.
The solution is to use an in-memory cache-store.
In this tutorial, we will implement caching in NestJs and ultimately scale it with Redis, a fast in-memory database that is perfect for this use case.
Pre-requisites
- A NestJs starter project ready
- Node version 16 or greater
- Docker
Add an in-memory cache using the NestJs Cache Module
We will start by implementing the in-memory cache manager provided by NestJs, it will save the cache into the server’s RAM. Once ready, we will transition to Redis for a more scalable caching solution.
The NestJs CacheModule is included in the `@nestjs/commonpackage. You will need to add it to your app.module.ts file.
app.module.ts
import { CacheModule, Module } from '@nestjs/common';
import { AppController } from './app.controller';
@Module({
  imports: [
    CacheModule.register({
      isGlobal: true,
    }),
  ],
  controllers: [AppController],
})
export class AppModule {}
Note that we declare the module as global with isGlobal set to true. This way we don’t need to re-import the caching module if we want to use it in a specific service or controller.
The Cache Module handles a lot of cache configuration for us, and we will customize it later. Let’s just point out that we can use caching with two different approaches:
- The Interceptor approach
- The Cache Manager approach with dependency injection
Let’s briefly go through the pros and cons of each of them
When to use Interceptor vs Cache Manager in NestJs?
The interceptor approach is cleaner, but the cache manager approach gives you more flexibility with some overhead.
As a rule of thumb, you will use the Cache Interceptor If you need an endpoint to return cached data from the primary database in a traditional CRUD app.
However, if you need more control or do not necessarily want to return cached data, you will use the cache manager service as dependency injection.
So to summarise…
You will use the Cache Manager if you need more control, like:
- Deleting from cache
- Updating cache
- Manually fetching data from the cache store
- A combination of the above 👆🏻
To give a practical example, if you need to get a list of posts and you have an endpoint that fetches that list from the database. You need to use a cache interceptor.
For anything more complex, the cache manager will be required.
Caching in NestJs using the Cache Interceptor
Let’s start with the interceptor, as it allows you to auto-cache responses from your API. You can apply the cache interceptor to any endpoint that you want to cache.
We’ll create an `src/utils.tsfile that will store a getter function with a small timeout to simulate some database delay.
utils.ts
// gets an array of dogs after 1 second delay
export function getDogs() {
  return new Promise((resolve) => {
    setTimeout(() => {
      resolve([
        {
          id: 1,
          name: 'Luna',
          breed: 'Caucasian Shepherd',
        },
        {
          id: 2,
          name: 'Ralph',
          breed: 'Husky',
        },
      ]);
    }, 1000);
  });
}
Now that we have a getter function for our dogs, we can use it in the app.controller.ts
app.controller.ts
import { Controller, Get } from '@nestjs/common';
import { getDogs } from './utils';
@Controller()
export class AppController {
  @Get('dogs')
  getDogs() {
    return getDogs();
  }
}
Let’s add some cache! Adding caching with interceptors is as simple as this 👇🏻
app.controller.ts
import { CacheInterceptor, Controller, Get, UseInterceptors } from '@nestjs/common';
import { getDogs } from './utils';
@Controller()
export class AppController {
  @UseInterceptors(CacheInterceptor)
  @Get('dogs')
  getDogs() {
    return getDogs();
  }
}
In NestJS, you can utilize the cache-manager package to integrate caching functionality into your application. Here’s how you can use the cache-manager module in NestJS:
-
Install the required dependencies:
npm install cache-manager cache-manager-ioredis ioredis -
Import the necessary modules and set up the cache provider in a separate module, let’s call it
cache.module.ts:
import { Module, CacheModule } from '@nestjs/common';
import * as redisStore from 'cache-manager-ioredis';
import * as redis from 'ioredis';

@Module({
  imports: [
    CacheModule.register({
      store: redisStore,
      host: 'localhost', // Redis server host
      port: 6379, // Redis server port
      ttl: 60, // Time-to-live for cache entries in seconds
      max: 10, // Maximum number of cache entries to keep
      redisClient: new redis(),
    }),
  ],
  exports: [CacheModule],
})
export class CacheConfigModule {}- Import and use the cache provider in your service or controller:
import { Injectable } from '@nestjs/common';
import { Cache } from 'cache-manager';

@Injectable()
export class ExampleService {
  constructor(private readonly cache: Cache) {}

  async getData(): Promise<any> {
    const cacheKey = 'example_data';
    const cachedData = await this.cache.get(cacheKey);
    if (cachedData) {
      return cachedData;
    }

    const data = await this.fetchDataFromSource();
    await this.cache.set(cacheKey, data);
    return data;
  }

  private async fetchDataFromSource(): Promise<any> {
    // Simulate an asynchronous data retrieval
    return new Promise((resolve) => {
      setTimeout(() => {
        const data = 'Example data';
        resolve(data);
      }, 1000);
    });
  }
}
In this example, we create a separate module called CacheConfigModule to set up the cache provider using the CacheModule.register() method. We configure it to use the cache-manager-ioredis store, which utilizes Redis as the caching backend. You can adjust the configuration options according to your Redis server settings and caching requirements.
Next, we inject the Cache instance from the cache-manager module into the ExampleService constructor. Within the getData() method, we check if the requested data is available in the cache. If it is, we return the cached data. Otherwise, we fetch the data from the source, store it in the cache using the set() method, and return the fetched data.
With this setup, you can use the cache provider in other services or controllers by injecting the Cache instance and utilizing the caching methods (get(), set(), del(), etc.) as needed.
Remember to import and include the CacheConfigModule in your application module (AppModule) to ensure the cache provider is available throughout your application.
By integrating the cache-manager module into your NestJS application, you can easily incorporate caching functionality and improve the performance and responsiveness of your application by reducing the need for expensive data retrieval operations.